
Account
University of Bern
AstroFFT System - 2005.03.01
Introduction
This document is designed to give an overview of installing the AstroFft system and using it at the University of Bern. Full documentation is on the BEAM AstroFft web site at: https://portal.beam.ltd.uk/support/astrofft and on the AstroFft Install and Source CDROM's in the doc directory.System Components
The system comprises of the following components:| ADM-A2D | Analogue to digital converter card. Installed on PCI carrier. |
| ADM-XRC/812E-6/4/P | FPGA processing card. Installed on PCI carrier. |
| ADC-PMC | PCI Carrier card |
| FPGA AstroFFT Firmware | The FPGA firmware implementing the FPGA processing algorithm. Part of AstroFft software package. |
| ADMXRC2 Driver | The Linux driver for the FPGA processing card. Part of AstroFft software package. |
| AstroFft software | The AstroFFT host software package for Linux |
| AstroFftGui Software | A GUI front-end application for controlling the AstroFFT system |
Hardware Installation
The ADC-PMC carrier card, which has the ADM-A2D and ADM-XRC/812E-6/4/P installed onto it, should be installed into a vacant 64 or 32 bit PCI slot. The PCI slot should be a 3.3Volt slot. Static electricity precautions should be used while installing and connecting to the board. The ATD board has 4 connectors on the rear. Two of these are the analogue inputs (1v p-p, 50ohms), one is used for an optional external digital clock source (0-5V, 100ohms) and the third, mini d-type connector, is connected directly to the FPGA for special uses.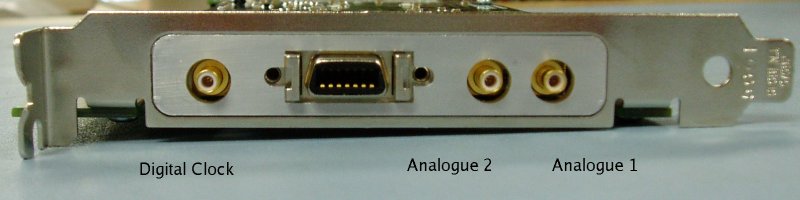
Software Installation
The AstroFft software is supplied on a CDROM and is also available on the BEAM AstroFft web site. The packages are at: https://portal.beam.ltd.uk/support/astrofft/packages. Please follow the instructions in softInstallDebian.html to install the AstroFFT software onto a Debian Linux host system.The AstroFftGui package is optional. This package provides a GUI front-end that can operate the AstroFft system. It can be installed on a separate host system if required. It does require the host system to have a number of Debian GUI packages installed including X-Windows, QT and QWT.
Testing
Once the AstroFft hardware and software has been installed a simple test of operation can be performed. This can be performed using the AstroFftGui test program or the simpler command line astrotest program.To use the AstroFftGui program start the program with the host name of the machine running the astrofft process "astrofftgui <astrofft host>. You can start off a simple test run by clicking on the "Run" button. You should see the first graph fill with the FFT data after one second. The AstroFftGui program allows many parameters to be configured. More information is in its manual: astroGui.html.
To use the astrotest program simply run on the AstroFft host itself. You should see the astrofft program looping and fetching a number of blocks of data from the AstroFft system.
Loop: 0 DataPacket: Len(32832) Chan(1) Err(0) Time(2005-03-01T11:54:53.491Z) DataPacket: Len(32832) Chan(1) Err(0) Time(2005-03-01T11:54:53.492Z) DataPacket: Len(32832) Chan(1) Err(0) Time(2005-03-01T11:54:53.493Z) DataPacket: Len(32832) Chan(1) Err(0) Time(2005-03-01T11:54:53.493Z) DataPacket: Len(32832) Chan(1) Err(0) Time(2005-03-01T11:54:53.493Z) DataPacket: Len(32832) Chan(1) Err(0) Time(2005-03-01T11:54:53.494Z) DataPacket: Len(32832) Chan(1) Err(0) Time(2005-03-01T11:54:53.494Z) DataPacket: Len(32832) Chan(1) Err(0) Time(2005-03-01T11:54:53.494Z) Loop: 1 DataPacket: Len(32832) Chan(1) Err(0) Time(2005-03-01T11:54:55.781Z) DataPacket: Len(32832) Chan(1) Err(0) Time(2005-03-01T11:54:55.782Z) DataPacket: Len(32832) Chan(1) Err(0) Time(2005-03-01T11:54:55.783Z) DataPacket: Len(32832) Chan(1) Err(0) Time(2005-03-01T11:54:55.783Z) DataPacket: Len(32832) Chan(1) Err(0) Time(2005-03-01T11:54:55.783Z) DataPacket: Len(32832) Chan(1) Err(0) Time(2005-03-01T11:54:55.784Z) DataPacket: Len(32832) Chan(1) Err(0) Time(2005-03-01T11:54:55.784Z) DataPacket: Len(32832) Chan(1) Err(0) Time(2005-03-01T11:54:55.784Z
Usage of System
The system can be used in a number of ways. A typical usage would be as follows:- The system will employ the astrofft process to control the FPGA FFT process and capture and process the resulting data.
- A user written program will connect to the control and data network sockets of the AstroFft process to control and acquire data.
- We would expect the AstroFft system to be set to the "RFFT" Real FFT mode. This will probably give the best results. In this mode only the signal from the first analogue channel is used.
- The system would be set to use the internal digital clock set to 50MHz. It is possible to set the system to use an external 50MHz clock if required.
- The user written program would setup the number of FFT averages to be performed in the FPGA and in software in the AstroFft daemon. These values are set to give the required overall FFT average time without exceeding the FPGA's integrator. Note that the FPGA's integrator is 64bits wide. The "IntScale" parameter in the /etc/astrofft.conf file defines which set of 32bits is output from this integrator. Thus for maximum resolution of data the "IntScale" and "FPGA FFT Average" parameters need to be set as appropriate for the type of data being processed.
- The user written program would either set the AstroFft process to store the resulting FFT data to disk or read the data over the astrofftdata network data socket.
- The AstroFft daemon places the resulting data files, if setup to do so, in the /data directory. If other systems need access to this directory they can be exported using NFS or Samba.